Getting Started
Teams
Getting Started with Market Leader Teams for Team Leaders
Getting Started with Market Leader Teams for Team Members
Getting Started with Your Shared Marketing Center for Teams
Add an Agent to a Teams Account
Removing an Agent from a Teams Account
Lead Routing for Teams Agents
Personalize Your Marketing Email Footer for Market Leader Teams
Listing Alerts for Teams Agents
Create and Manage Groups for Team Members
Contacts Details for Team Account Members
Sharper Agent
Market Leader Professional
Network Boost Checklist
Leads Direct Checklist
HouseValues Checklist
Getting Started Email Series
Profile
Email Settings
My Account
Add Agent MLS ID
Add Office MLS ID
Manage Your Activity Alerts
Manage Your Billing and Shipping Information
Add Your Profile Photo and Agency Logo
MLS Integration
My Account Settings
Daily Activity Email
Market Leader Mobile App
Profile Settings
Profile Settings for Sharper Agent
Contacts
Lead Intel
Contact Details
Add a Contact
Edit a Contact
Contact Address
Listing Alerts
Contact Search
Import Contacts
Export Contacts
Contact Types
Contact Status
Create and Manage Groups
Bulk Updates to Contact Records
Contact Welcome Email
Send a Quick CMA
Add Contact Notes
Send MLS Listings to Contacts
Delete a Contact
Personalize Your Emails
Send an Email
Managing Emails in Your Market Leader System
How to Schedule an Email
Add Images to Your Emails
Add Contacts to Your Email
SMS
SMS Setup Essentials
SMS Setup for Individual Account
SMS Setup for Team Account
Receiving Opt-In Consent for SMS Messages
SMS in Nurture Campaigns
Responding to SMS messages
Website
Website Setup Wizard
Choose Your Website Layout
View or Edit Your Website
Website Logo and Hero Image
Personalize Your About Page
Customize Your Home Page
Create a Custom Page on Your Website
Customize Your SEO Titles and Descriptions
Website Widgets
Site Activity
Add or Edit the Communities You Serve
Add Client Recommendations to Your Website
Delete a Recommendation
Add an Image to Your Website
Adding a Video to Your Website
Creating a Blog Post for Your Website
Website Listing Search Options
Add a Facebook Pixel
Manage Your Featured Partners
Generate Leads Using a Search Widget
Customize Your Website Pages & Menus
Select Your Domain
5 Reasons Why You Should Be Blogging
Change Your Nameservers on GoDaddy
Customize Your Sell Page Text
Website Sections
Lead Capture Widget
Listings
Listing Details
Market Your Listings
Create a Custom Property
Showcase Properties With a Single Property Website
Listing Marketing Automation
Marketing Center
Getting Started with Your Marketing Center
Welcome to Your Marketing Center
Getting Started with Your Marketing Center
Using the Marketing Email Editor
Upload a Mailing List
Share a Marketing Email Design on Social Media
Create a Hyperlink
Using the Image Manager
Find a Saved Design
Order Professional Printing
XpressDocs Print Pricing Guide
Print Marketing - Printing Terms and Conditions for XpressDocs
XpressDocs Shopping Cart FAQ
Campaigns
Campaign Types
Campaign Status
Create a New Campaign
Find a Saved Campaign
Edit a Saved Campaign
Create a Custom Campaign
Customize Your Campaign
Add a Contact to a Campaign
Add a Postcard to a Campaign
Add an Activity to a Campaign
Add a Step to a Campaign
Add an Email to a Campaign
Campaigns FAQ
Design Library
Using the Marketing Design Editor
Create a Greeting Card
Create a Flyer
Create a Marketing Email
Email a Marketing Design
Create a Marketing Guide
Create a Postcard
Add Contacts to a Print Design
Create a Listing Enabled Design
Create a Sellers Home Valuation Request
Create a Transparent Image
Personalizing and Activating a Marketing Email Footer
Print a Marketing Design Yourself
Coaching
Lead Engagement
Turning Leads into Gold
Network Boost: Grow Your Network With Social Media Lead Generation
Working with Online Leads
We're Getting Engaged!
When Seller Meets Buyer
Buy Baby Buy
We've Got a Script for That
Master Your New Lead Follow-up
Social Media Marketing
Get Savvy with Social
Forging Your Social Media Strategy
Social Media Content Trends to Spark Engagement
Video Makes a Real Estate Star
Website Marketing
Marketing Strategy
Be the CMO of Your Business
Create and Automate with Market Leader
Whats Your Marketing Story, Morning Glory
System Tools
Ignite Key System Tools to Work Smarter Not Harder
Your Market Leader Toolbelt
Leveraging Your NEW Dashboard and Recent Updates for Maximum Impact
Strategy & Planning
Setting Your 2023 Business Plan
Understanding Today's Consumer
Create a VIP Experience for Your Sellers
Expert Panel - Your Questions Answered
NAR Settlement Impact: What to Start Doing Today
Agent Spotlight - Building a Million Dollar Pipeline with Tracey Todd
Shift Happens - How to Thrive in Any Market
Millennial Homebuyers and the Path to Ownership
Million Dollar Pipeline Program
Scripts
Buyer Engagement Scripts
Seller Engagement
Essential Seller Scripts
Opening and Discovery Scripts
Objection Handling Scripts
Contact Unsubscribed
Re-Engagement Scripts
Engage Your Way to the Top
Initial Response Scripts
Our Best Email Templates
Integrations
Lead Stream
Google Analytics
Google Contact Sync
Office 365 Contact Sync
Craigslist Posting Tool
Activate Zillow Tech Connect for your Market Leader System
Add Your Market Leader Email Address to Your Homes.com Profile
Add Your Market Leader Professional Email Address to Your Realtor.com Profile
Add Your Market Leader Professional Email Address to Your Brivity.com Profile
Add Your Market Leader Email Address to Your Listings To Leads Profile
Lead Products
The Journey of a Lead Through the Market Leader System
The Journey of a Lead Through the Market Leader System [Video]
Network Boost
Network Boost Lead Experience
Leads Direct Lead Experience
HouseValues Lead Experience
Get Leads
Customer Service
Table of Contents
- All Categories
- Contacts
- Import Contacts
Import Contacts
Importing all of your contacts into one system allows you to effectively keep in touch with all your contacts, build relationships, and win more business. You can import contacts from a CSV file (which is the most common), or you can import from the following sources:
- Google Contacts
- Office 365
CSV Import
🛑 Want us to do this for you? We do too! Contact us so we can help: support@marketleader.com or 877-450-0088
When importing a CSV file, you can create a custom contact list, or you can export contacts from other online programs - just make sure you save your list as a Comma Separated File (CSV).
Now, there are two very important parts to the process, and you'll want to start from the beginning to ensure a successful import:
- Preparing Your List for Import
- Uploading & Importing Your List
Not using Microsoft Excel?
- If you're using Numbers: Click on "File > Export As > Windows CSV"
- If you're using Excel for Mac: Click on "File > Save as > Specialty Formats > Windows CSV"
- If you're using anything else: Get a Google Sheets account and use that for your import
Preparing Your List for Import
Quick Tips
- Each contact in your import file must have at least a first name, last name, and either an email address, complete physical address, or home phone number. All other columns are optional.
- If you are importing a birthday or purchase anniversary, you may need to format the cells in your spreadsheet. The required format is YYYY-MM-DD (example: 1980-04-16).
- You can import 10 - 4,999 contacts per import. Also, you can import multiple files per day.
- The maximum number of contacts you can import into your system is a total of 15,000.
- Organize your import file(s) by Status, Type, and Group before you import them into the system.
Uploading & Importing Your Contact List
Quick Tips
- You can choose how to map each column to a specific field in your system, so you don't have to spend time trying to match up your column headers.
- The Status, Type, and Group selections you make will be applied to all of the contacts in the file that you are importing.
- It can take up to an hour for the system to process and import your file.
- You can see the status of your imports by clicking the View Import History button.
- You can download a list of contacts that failed to import, so you can fix the errors that caused them to fail, and then upload & import that list.
- If there are errors in the first 10 rows of your list, you’ll see a message next to the field that has the error; click the Edit link for that field, you’ll see what the error is.
- The most common errors are: a required field is missing, an email address is invalid, or the contact already exists in your system.
Google Contacts Import
To do a one-time import from Google, first select Google Contacts from the menu.
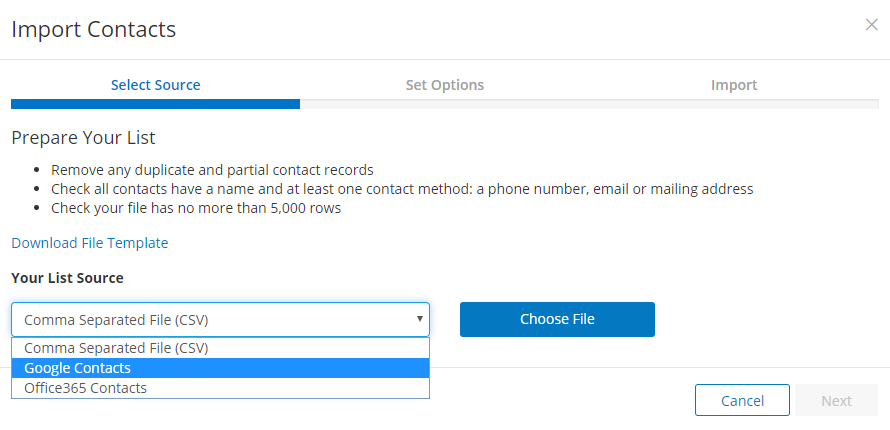
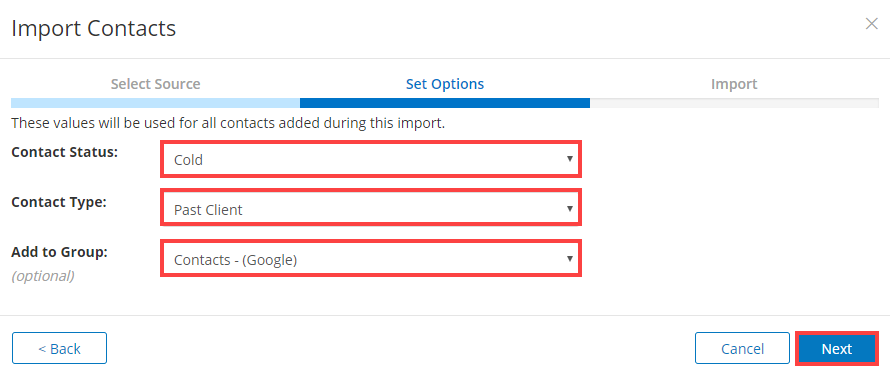
Next, select the contact status, type, and group for your Google Contacts, then click Next.
Then check the box to verify all of these contacts are not from a purchased email list, then click the Import button.
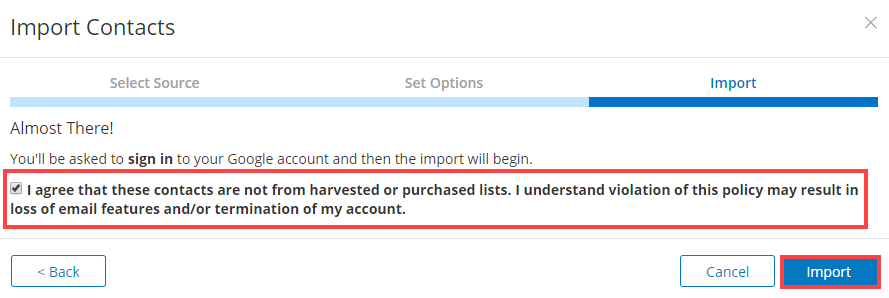
You'll be prompted to enter your Google login and password, and then once you enter your credentials, your Google import will start.
Office 365
To do a one-time import from Office 365, first select Office 365 from the menu.
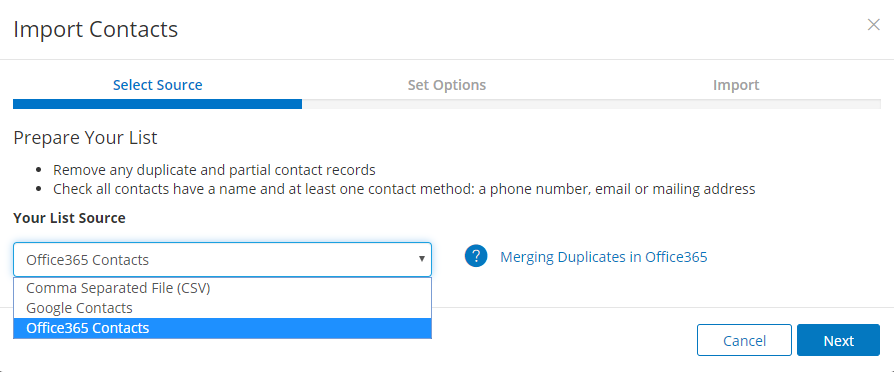
Next, select the contact status, type, and group for your O365, then click Next.

Then check the box to verify all of these contacts are not from a purchased email list, then click the Import button.

You'll be prompted to enter your Office 365 login and password, and then once you enter your credentials, your import will start.