Getting Started
Teams
Getting Started with Market Leader Teams for Team Leaders
Getting Started with Market Leader Teams for Team Members
Getting Started with Your Shared Marketing Center for Teams
Add an Agent to a Teams Account
Removing an Agent from a Teams Account
Lead Routing for Teams Agents
Personalize Your Marketing Email Footer for Market Leader Teams
Listing Alerts for Teams Agents
Create and Manage Groups for Team Members
Contacts Details for Team Account Members
Sharper Agent
Market Leader Professional
Network Boost Checklist
Leads Direct Checklist
HouseValues Checklist
Getting Started Email Series
Profile
Email Settings
My Account
Add Agent MLS ID
Add Office MLS ID
Manage Your Activity Alerts
Manage Your Billing and Shipping Information
Add Your Profile Photo and Agency Logo
MLS Integration
My Account Settings
Daily Activity Email
Market Leader Mobile App
Profile Settings
Profile Settings for Sharper Agent
Contacts
Lead Intel
Contact Details
Add a Contact
Edit a Contact
Contact Address
Listing Alerts
Contact Search
Import Contacts
Export Contacts
Contact Types
Contact Status
Create and Manage Groups
Bulk Updates to Contact Records
Contact Welcome Email
Send a Quick CMA
Add Contact Notes
Send MLS Listings to Contacts
Delete a Contact
Personalize Your Emails
Send an Email
Managing Emails in Your Market Leader System
How to Schedule an Email
Add Images to Your Emails
Add Contacts to Your Email
SMS
SMS Setup Essentials
SMS Setup for Individual Account
SMS Setup for Team Account
Receiving Opt-In Consent for SMS Messages
SMS in Nurture Campaigns
Responding to SMS messages
Website
Website Setup Wizard
Choose Your Website Layout
View or Edit Your Website
Website Logo and Hero Image
Personalize Your About Page
Customize Your Home Page
Create a Custom Page on Your Website
Customize Your SEO Titles and Descriptions
Website Widgets
Site Activity
Add or Edit the Communities You Serve
Add Client Recommendations to Your Website
Delete a Recommendation
Add an Image to Your Website
Adding a Video to Your Website
Creating a Blog Post for Your Website
Website Listing Search Options
Add a Facebook Pixel
Manage Your Featured Partners
Generate Leads Using a Search Widget
Customize Your Website Pages & Menus
Select Your Domain
5 Reasons Why You Should Be Blogging
Change Your Nameservers on GoDaddy
Customize Your Sell Page Text
Website Sections
Lead Capture Widget
Listings
Listing Details
Market Your Listings
Create a Custom Property
Showcase Properties With a Single Property Website
Listing Marketing Automation
Marketing Center
Getting Started with Your Marketing Center
Welcome to Your Marketing Center
Getting Started with Your Marketing Center
Using the Marketing Email Editor
Upload a Mailing List
Share a Marketing Email Design on Social Media
Create a Hyperlink
Using the Image Manager
Find a Saved Design
Order Professional Printing
XpressDocs Print Pricing Guide
Print Marketing - Printing Terms and Conditions for XpressDocs
XpressDocs Shopping Cart FAQ
Campaigns
Campaign Types
Campaign Status
Create a New Campaign
Find a Saved Campaign
Edit a Saved Campaign
Create a Custom Campaign
Customize Your Campaign
Add a Contact to a Campaign
Add a Postcard to a Campaign
Add an Activity to a Campaign
Add a Step to a Campaign
Add an Email to a Campaign
Campaigns FAQ
Design Library
Using the Marketing Design Editor
Create a Greeting Card
Create a Flyer
Create a Marketing Email
Email a Marketing Design
Create a Marketing Guide
Create a Postcard
Add Contacts to a Print Design
Create a Listing Enabled Design
Create a Sellers Home Valuation Request
Create a Transparent Image
Personalizing and Activating a Marketing Email Footer
Print a Marketing Design Yourself
Coaching
Lead Engagement
Turning Leads into Gold
Network Boost: Grow Your Network With Social Media Lead Generation
Working with Online Leads
We're Getting Engaged!
When Seller Meets Buyer
Buy Baby Buy
We've Got a Script for That
Master Your New Lead Follow-up
Social Media Marketing
Get Savvy with Social
Forging Your Social Media Strategy
Social Media Content Trends to Spark Engagement
Video Makes a Real Estate Star
Website Marketing
Marketing Strategy
Be the CMO of Your Business
Create and Automate with Market Leader
Whats Your Marketing Story, Morning Glory
System Tools
Ignite Key System Tools to Work Smarter Not Harder
Your Market Leader Toolbelt
Leveraging Your NEW Dashboard and Recent Updates for Maximum Impact
Strategy & Planning
Setting Your 2023 Business Plan
Understanding Today's Consumer
Create a VIP Experience for Your Sellers
Expert Panel - Your Questions Answered
NAR Settlement Impact: What to Start Doing Today
Agent Spotlight - Building a Million Dollar Pipeline with Tracey Todd
Shift Happens - How to Thrive in Any Market
Millennial Homebuyers and the Path to Ownership
Million Dollar Pipeline Program
Scripts
Buyer Engagement Scripts
Seller Engagement
Essential Seller Scripts
Opening and Discovery Scripts
Objection Handling Scripts
Contact Unsubscribed
Re-Engagement Scripts
Engage Your Way to the Top
Initial Response Scripts
Our Best Email Templates
Integrations
Lead Stream
Google Analytics
Google Contact Sync
Office 365 Contact Sync
Craigslist Posting Tool
Activate Zillow Tech Connect for your Market Leader System
Add Your Market Leader Email Address to Your Homes.com Profile
Add Your Market Leader Professional Email Address to Your Realtor.com Profile
Add Your Market Leader Professional Email Address to Your Brivity.com Profile
Add Your Market Leader Email Address to Your Listings To Leads Profile
Lead Products
The Journey of a Lead Through the Market Leader System
The Journey of a Lead Through the Market Leader System [Video]
Network Boost
Network Boost Lead Experience
Leads Direct Lead Experience
HouseValues Lead Experience
Get Leads
Customer Service
Table of Contents
- All Categories
- Website
- Add or Edit the Communities You Serve
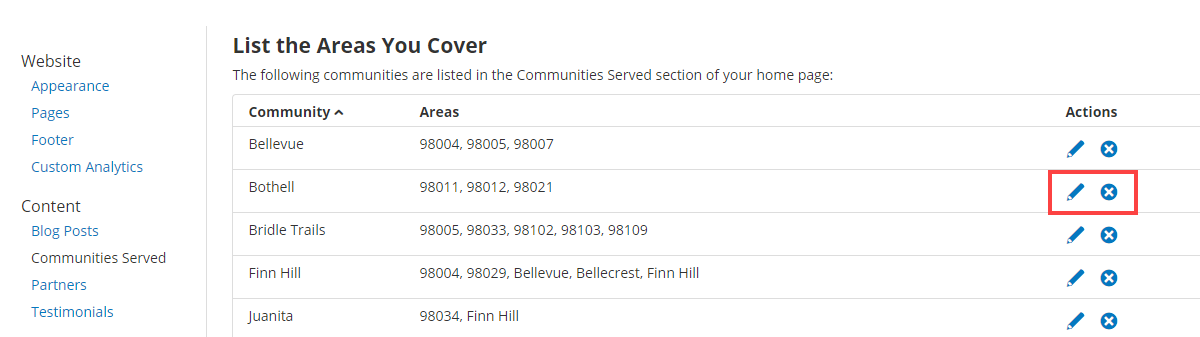
Add or Edit the Communities You Serve
Communities served is a great way to boost SEO, while providing valuable neighborhood information for consumers. Community pages can be found in the Communities section of your website, and you can use widgets to showcase these pages. Learn how to add widgets
Add a Community
To add communities to your website, click on Communities Served in the website content menu. Then click Add Community.
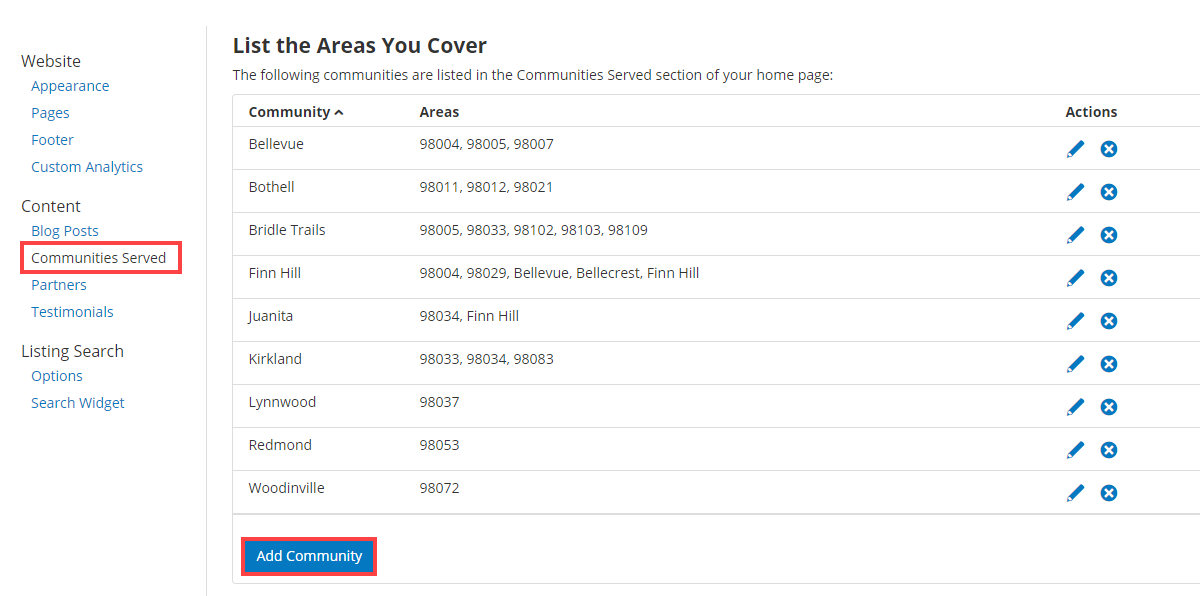
From here, there are four steps to create a great community page:
- Community name*
- Community boundary*
- Community description*
- Community characteristics
- Community photos
- SEO settings
* = Indicates a required step
Community Name
First, enter the community name in the Name field. You can check the Primary Community box if you want to showcase this community in Communities Served widgets you add to your home page or custom pages. Learn how to add widgets

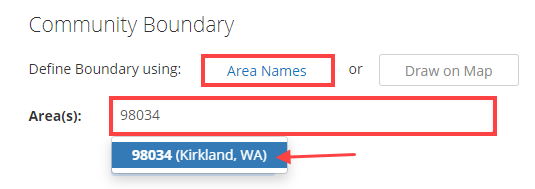
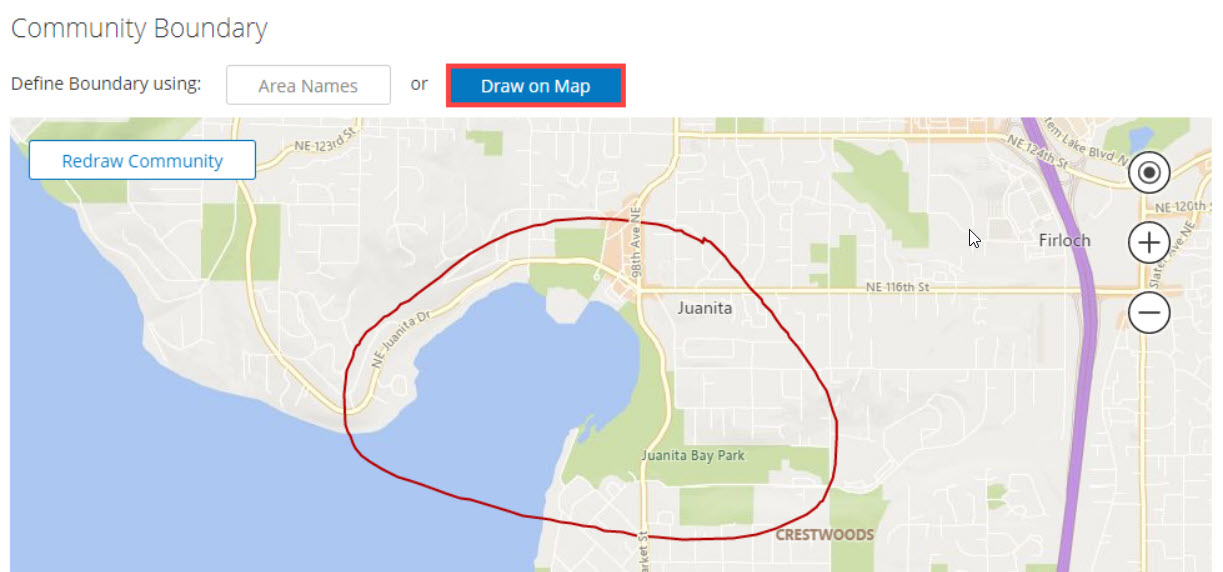
Community Boundary
Next, you'll need to create a boundary for your community. There are two different ways you can create a community boundary:
- Zip Code or Neighborhood
- Custom Boundary
Zip Code
To add a zip code or neighborhood, simply start typing the zip code or neighborhood in the Area(s) box, and then select from the auto-fill menu.
Custom Boundary
To draw a custom boundary for your community, click the Draw on Map button. Then, click the Draw Community button and use your mouse to draw your custom boundary (you may need to zoom in on the map to create just the right boundary).
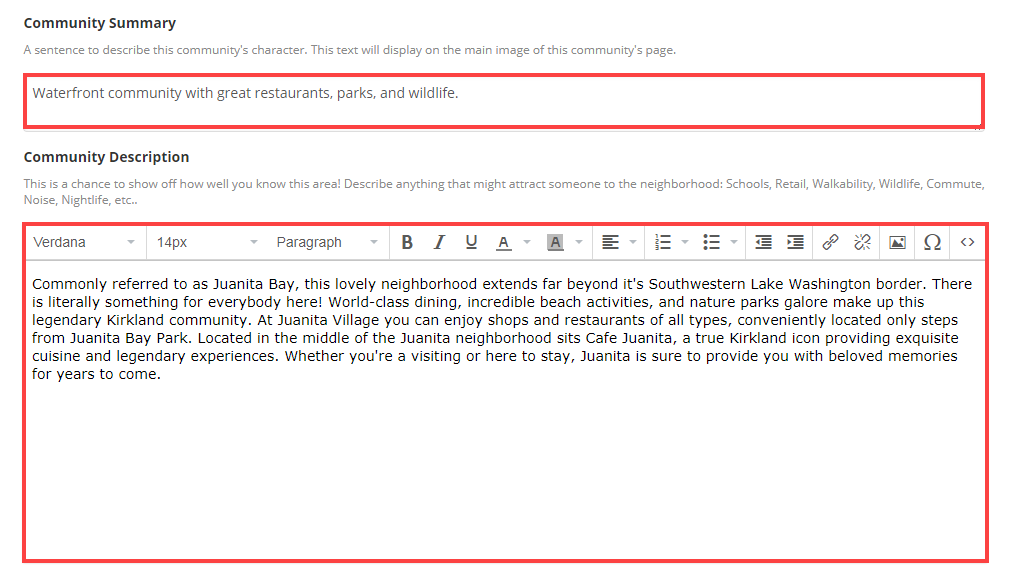
Community Description
Once you've associated a geographic area, you'll need to add a short community summary, and a community description. The community summary should be a few words, and the description should provide great community information for consumers.
- What are some of the local landmarks or tourist attractions?
- Why would someone want to live here?
- What's your favorite thing about this community?
- Where's the best coffee shop or restaurant?
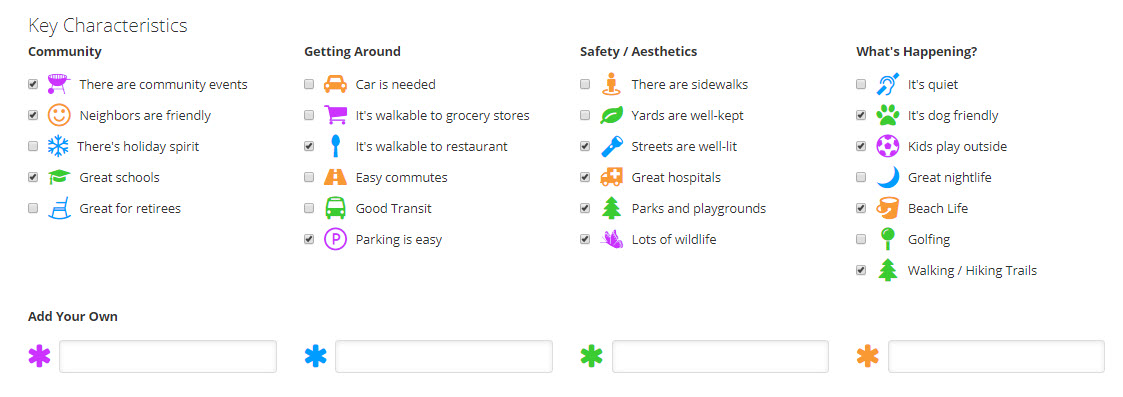
Community Characteristics
Next, you can select community characteristics so consumers can learn even more about the area. You can check the boxes that apply to the community, or you can also add up to four of your own, custom characteristics too.
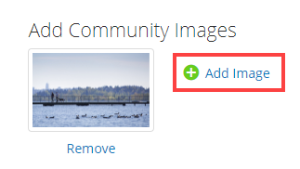
Community Photos
Now you can add up to three photos to represent your community (we always recommend adding at least one community image). This can be a photo you've taken, or any professional image you own the rights to use. Simply click the Add Image link to upload a community photo.
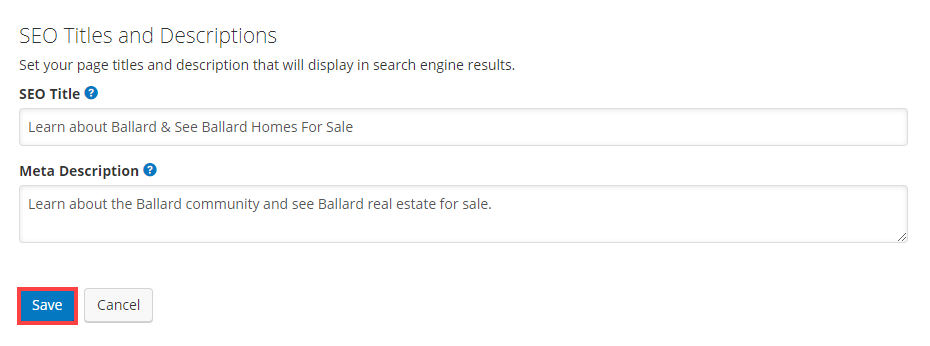
SEO Settings
The last step is to add the SEO title and Meta Description for your community page, which is great for SEO! When you're finished, click Save. Learn more about SEO titles & descriptions
To edit an existing community click the edit icon in the Actions column. To remove a community click the delete icon.